Automation
Automation enables hands-free time tracking by automatically starting and stopping your timer based on location, Wi-Fi connection, or NFC tags. Perfect for routine work locations like offices, client sites, or home offices.
Understanding automation
Benefits
- Hands-free tracking: never forget to start or stop your timer
- Accurate records: captures exact arrival/departure times
- Multiple methods: choose what works best for your situation
- Team sharing: share automations with project team members (Pro)
Automation methods
The app supports three automation types:
- Geofence: location-based (most reliable)
- WLAN: Wi-Fi network-based (simple setup)
- NFC: physical NFC tag scanning (most precise)
Automation list
Access automations from the main menu:
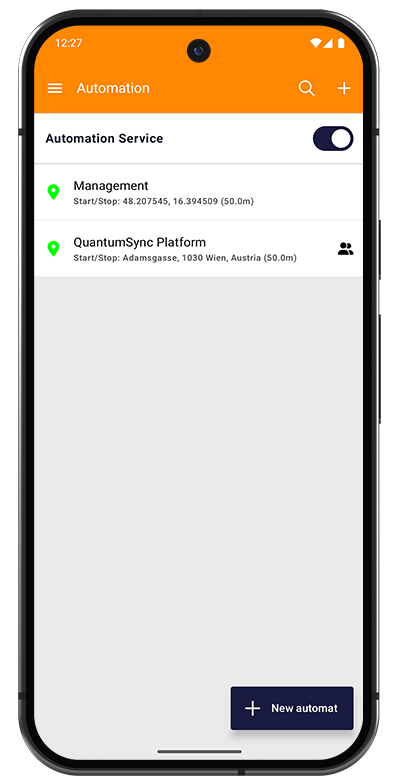
Automation Service Toggle:
- Master switch at the top of the screen
- Turn OFF to temporarily disable all automations
- Useful when you don't want automatic tracking
Automation List Display:
Each automation shows:
- Type icon: Geofence (location pin), WLAN (Wi-Fi), or NFC icon
- Project name: which project this automation controls
- Action: Start/Stop or other configured action
- Details: location coordinates and distance, or Wi-Fi name
- Team icon: appears if shared with project team
Creating an Automation: Tap the "+ New automat" button at the bottom.
Prerequisites
Before creating automations, ensure proper permissions are granted:
Location permission (for geofence)
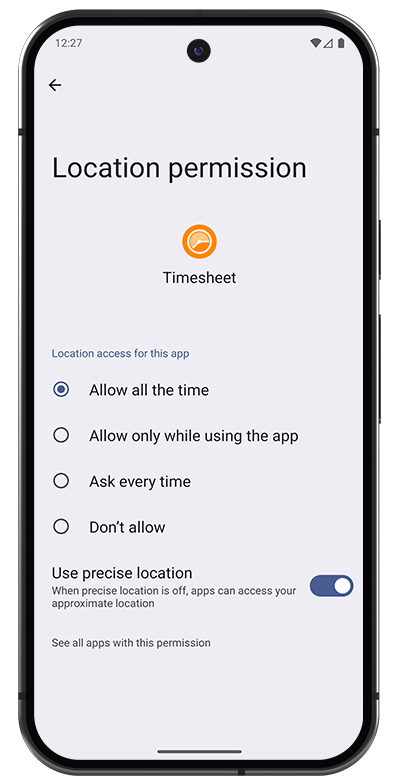
For geofence automations to work reliably:
-
Location access: select "Allow all the time"
- Required for background location tracking
- Enables geofence detection even when app is closed
-
Use precise location: toggle ON
- Improves geofence accuracy
- Recommended for smaller radius geofences
Other Permission Options:
- "Allow only while using the app": won't work for geofences
- "Ask every time": not suitable for automation
- "Don't allow": disables location-based features
Wi-Fi permission (for WLAN)
Grant Wi-Fi access when prompted for WLAN automations.
NFC permission (for NFC tags)
NFC must be enabled in your device settings.
WLAN tracking
Wi-Fi-based automation triggers when your phone connects to or disconnects from a specific Wi-Fi network. Ideal for office environments with reliable Wi-Fi.
How WLAN automation works
Trigger Events:
- Timer starts when connecting to the specified Wi-Fi
- Timer stops when disconnecting from the Wi-Fi
Use Cases:
- Office with dedicated Wi-Fi network
- Home office setup
- Client sites with known Wi-Fi access
- Co-working spaces
Creating WLAN automation
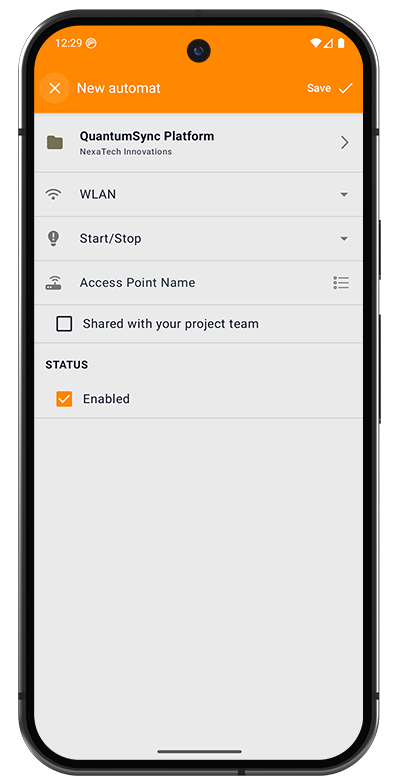
Configuration Fields:
-
Project Selector (top): choose which project to track
- Example: "QuantumSync Platform, NextTech Innovations"
-
Type: select "WLAN"
- Dropdown shows: Geofence, WLAN, NFC options
-
Action: select "Start/Stop"
- Other options may include Start Only, Stop Only, or Pause
-
Access Point Name: enter the Wi-Fi network name (SSID)
- Type or select from detected networks
- Must match exactly
-
Shared with your project team: checkbox (Pro feature)
- Share this automation with team members
- They can use the same automation for the project
STATUS:
- Enabled checkbox: make automation active
- Uncheck to temporarily disable without deleting
To Save: Tap Save in the top-right corner.
WLAN limitations
Some Android devices disconnect from Wi-Fi when the screen is locked to save battery. This can cause:
- Intermittent timer starts/stops every 5-10 minutes
- Inaccurate time tracking
- Multiple short tasks instead of one continuous session
Solutions:
- Check device Wi-Fi settings for "Keep Wi-Fi on during sleep"
- On Samsung devices: Settings > Connections > Wi-Fi > Advanced > Keep Wi-Fi on during sleep > Always
- Consider using Geofence instead for more reliability
Geofence tracking
Location-based automation that creates a virtual boundary (geofence) around a specific location. The most reliable automation method for most devices.
How geofence automation works
Trigger Events:
- Timer starts when you enter the geofence area
- Timer stops when you leave the geofence area
Reliability:
- Works even with screen locked and app closed
- Uses Android's built-in geofencing API
- More reliable than Wi-Fi on most devices
- Accuracy varies by device GPS capability
Use Cases:
- Office buildings
- Client sites
- Construction sites
- Any fixed work location
Creating geofence automation
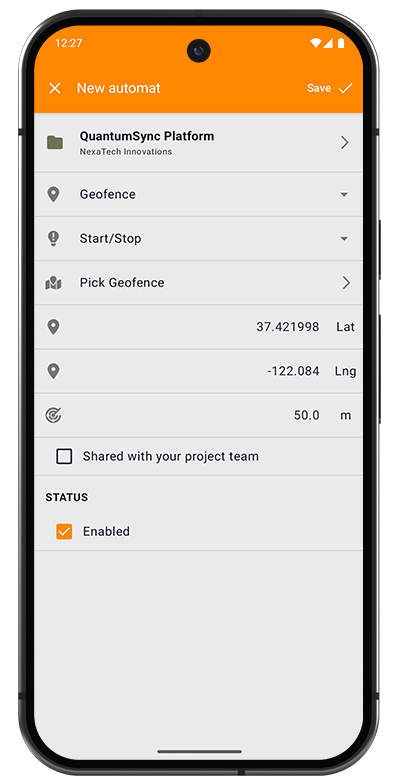
Configuration Fields:
-
Project Selector (top): choose which project to track
- Example: "QuantumSync Platform, NextTech Innovations"
-
Type: select "Geofence"
- Dropdown shows: Geofence, WLAN, NFC options
-
Action: select "Start/Stop"
- Other options may include Start Only, Stop Only, or Pause
-
Pick Geofence: navigate to map picker
- Tap to open interactive map
- Set location and radius
-
Coordinates Display
- Latitude: shows selected location (e.g., "37.421998 Lat")
- Longitude: shows selected location (e.g., "-122.084 Lng")
- Radius: geofence size in meters (e.g., "50.0 m")
-
Shared with your project team: checkbox (Pro feature)
- Share this automation with team members
- Team members can use the same geofence
STATUS:
- Enabled checkbox: make automation active
- Uncheck to temporarily disable
Setting geofence location
Tap "Pick Geofence" to open the interactive map:
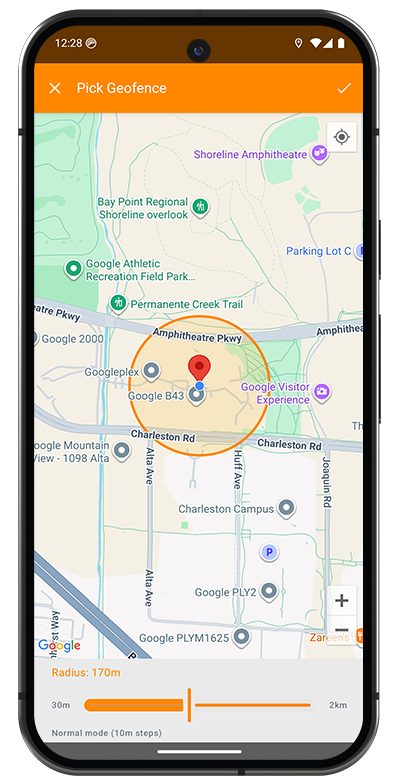
Map Interface:
-
Red Pin: center point of your geofence
- Drag the map to position the pin
- Long-press to drop pin at specific location
-
Orange Circle: visual representation of geofence boundary
- Shows the detection radius
- Timer triggers when you cross this boundary
-
Radius Slider (bottom)
- Adjust geofence size from 30m to 2km
- Current radius displayed (e.g., "Radius: 170m")
- Slider shows: "30m" (left) to "2km" (right)
- "Normal mode (10m steps)": precision indicator
-
Location Button (top right): center map on your current location
-
Checkmark (top right): confirm and save location
Choosing Radius Size:
- 30-50m: small buildings, precise entry/exit
- 50-100m: medium buildings, parking lots included
- 100-200m: large campuses, early detection
- 200m+: very large areas, may trigger too early
Start with 100m for most office buildings. This provides good balance between early detection and accuracy. Adjust based on your experience.
Geofence requirements
Background Location Permission Required
Geofence tracking will NOT work without "Allow all the time" location permission. See Prerequisites section above.
Without this permission:
- Geofences won't trigger
- Timer won't start/stop automatically
- Automation appears to be broken
NFC tracking
Physical tag-based automation using Near Field Communication (NFC). The most precise method requiring manual interaction.
How NFC automation works
Trigger Method:
- Tap your NFC-enabled phone against a programmed NFC tag
- Instant timer start, stop, or pause action
- No location or Wi-Fi dependency
Advantages:
- 100% accurate triggering
- No false positives
- Works offline
- No battery impact from background services
- Simple and reliable
Use Cases:
- Desk-based work stations
- Multiple project locations in same building
- Shared workspaces (place tag at your desk)
- Manufacturing or warehouse environments
- Anywhere you can place a physical tag
Creating NFC automation
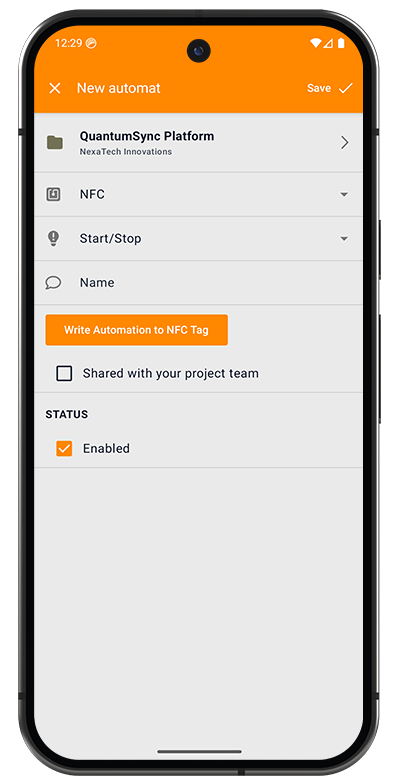
Configuration Fields:
-
Project Selector (top): choose which project to track
- Example: "QuantumSync Platform, NextTech Innovations"
-
Type: select "NFC"
- Dropdown shows: Geofence, WLAN, NFC options
-
Action: select "Start/Stop"
- Other options may include Start Only, Stop Only, or Pause
-
Name: optional identifier for the NFC tag
- Helps you remember which tag is which
- Example: "Office Desk", "Workshop Station", "Client Site A"
-
Write Automation to NFC Tag: orange button
- Tap to begin writing process
- Opens NFC writer screen
-
Shared with your project team: checkbox (Pro feature)
- Share this automation with team members
- They can write the same automation to their own tags
STATUS:
- Enabled checkbox: make automation active
- Uncheck to temporarily disable
Writing to NFC tag
After configuring, tap "Write Automation to NFC Tag":
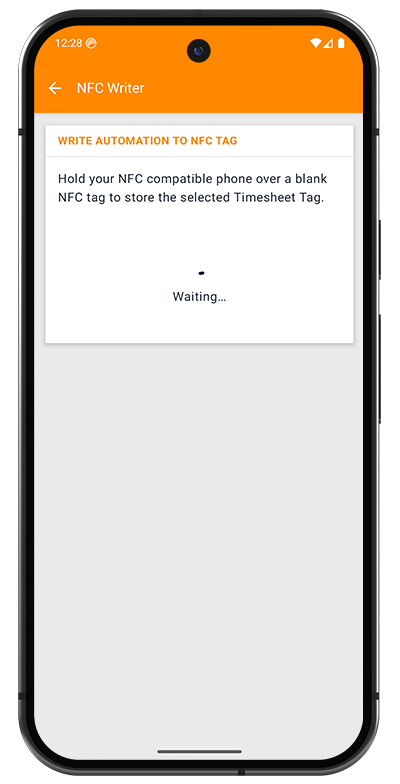
Writing Process:
-
Prepare NFC Tag
- Use a blank, writable NFC tag
- Any NDEF-compatible NFC tag works
- Tags are inexpensive and reusable
-
Follow Instructions
- Screen shows: "Hold your NFC compatible phone over a blank NFC tag to store the selected Timesheet Tag."
- Status displays: "Waiting..."
-
Scan Tag
- Hold your phone's NFC reader area near the tag
- Usually located at the back of the phone
- Keep steady for 1-2 seconds
-
Confirmation
- Success message appears when written
- Tag is now ready to use
-
Place Tag
- Affix tag to your work location
- Common places: desk, door frame, wall, clipboard
Using NFC tags
Daily Usage:
-
Arrival: tap phone against tag
- Timer starts for the associated project
- Notification confirms action
-
Departure: tap phone against tag again
- Timer stops
- Task is automatically created
Tips for Tag Placement:
- Eye Level: easy to remember and access
- Near Entry: door frame or wall near desk entrance
- Desk Surface: under desk pad or on monitor stand
- Protected: avoid high-traffic areas where tag might get damaged
NFC requirements
Phone Requirements:
- NFC-enabled Android device
- NFC turned on in device settings (Settings > Connected devices > Connection preferences > NFC)
- Not all phones have NFC (check device specifications)
Tag Requirements:
- Blank, writable NFC tag
- NDEF format support
- 144 bytes minimum capacity
- Available online or at electronics stores
Common NFC Tag Types:
- NTAG213: most common, inexpensive
- NTAG215: larger capacity
- NTAG216: highest capacity
- All work with Timesheet app
You can write the same automation to multiple NFC tags. Place one at your office desk and another at a remote work location for the same project.
Troubleshooting NFC
Tag Not Detected:
- Ensure NFC is enabled in phone settings
- Check phone has NFC capability
- Hold phone steady over tag for 2-3 seconds
- Try different position/angle
Wrong Action Triggered:
- Tag might have old data, rewrite the automation
- Verify automation is enabled in Automation list
- Check project assignment is correct
Nothing Happens:
- Verify Automation Service toggle is ON
- Check automation is not disabled
- Ensure tag was successfully written
Choosing the right automation method
Comparison
| Feature | Geofence | WLAN | NFC |
|---|---|---|---|
| Setup Complexity | Medium | Easy | Easy |
| Reliability | High | Medium | Very High |
| Battery Impact | Low | Very Low | None |
| Precision | Medium (30m-2km) | High | Exact |
| Manual Action Required | No | No | Yes |
| Works Indoors | Yes (GPS dependent) | Yes | Yes |
| Works Offline | Yes | No | Yes |
| Best For | Outdoor sites, large buildings | Office with Wi-Fi | Desk work, precision |
Recommendations
Use Geofence when:
- You need hands-free automation
- Location is outdoors or has good GPS signal
- You want reliable, automatic tracking
- Battery life is not a major concern
Use WLAN when:
- Office has reliable Wi-Fi
- You don't move around much during work
- Simple setup is priority
- You can ensure Wi-Fi stays connected when locked
Use NFC when:
- Maximum precision is required
- Battery conservation is critical
- You have multiple projects in same building
- You want zero false triggers
- You're okay with manual tap action
Combine Methods:
- Use Geofence for client sites + NFC for office desk
- Use WLAN as backup for Geofence
- Create multiple automations for different scenarios