Projects
Projects are the fundamental organizational unit in the Timesheet app, allowing you to group related work, track time, manage finances, and monitor progress across all your professional activities.
Understanding projects
Project structure
Each project serves as a container for:
- Tasks: Individual time entries for work sessions
- Financial data: Hourly rates, earnings, and expenses
- Location information: Work site addresses and geofencing
- Statistics: Comprehensive time and revenue analytics
- Team membership: Assignment to teams for collaboration (Pro feature)
Project ownership
Personal Projects:
- Created and owned by you
- Only visible to you
- Ideal for individual work and side projects
Team Projects (Pro):
- Assigned to a specific team
- Visible only to assigned project members
- Team members must be added as project members to access the project
- Exception: Users with "Team Manager" permission can see all team projects
- Enable collaborative time tracking with specific team members
- Shared reporting and analytics
- Perfect for agencies, studios, and group work
Project status
Projects can exist in two states:
Active Projects:
- Visible in the Timer screen for quick time tracking
- Appear in project selection dropdowns
- Included in current work statistics
Archived Projects:
- Hidden from Timer and active lists
- Still accessible for reporting and historical analysis
- Preserves all time entries and financial data
- Can be reactivated anytime
Viewing your projects
The Projects screen displays all your work in an organized list:
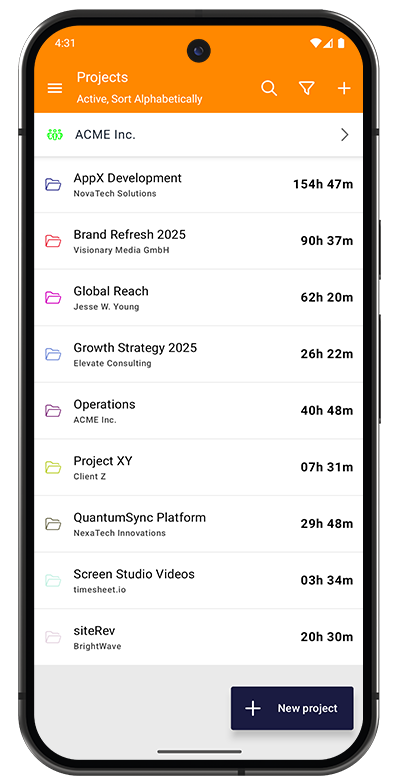
Each project shows:
- Color-coded icon: Quick visual identification
- Project name: Primary identifier
- Client/Employer: Organization or individual (displayed below project name)
- Total time tracked: Accumulated hours across all tasks (right side)
Screen header displays:
- Team selector (top): Switch between teams to view team-specific projects (Pro feature)
- Current filter status (e.g., "Active, Sort Alphabetically")
- Search icon for quick project lookup
- Filter icon to adjust view settings
- Plus (+) icon to create new projects
With Timesheet Pro, you can create teams and assign projects to them. The team selector at the top allows you to quickly switch between your personal projects and your assigned team projects. You'll only see team projects where you've been added as a project member, unless you have "Team Manager" permission.
Creating a new project
Create projects to organize your work and enable accurate time tracking:
Quick start
- Tap the "+ New project" button at the bottom of the Projects screen
- Fill in the essential details (see below)
- Tap "Save" in the top-right corner
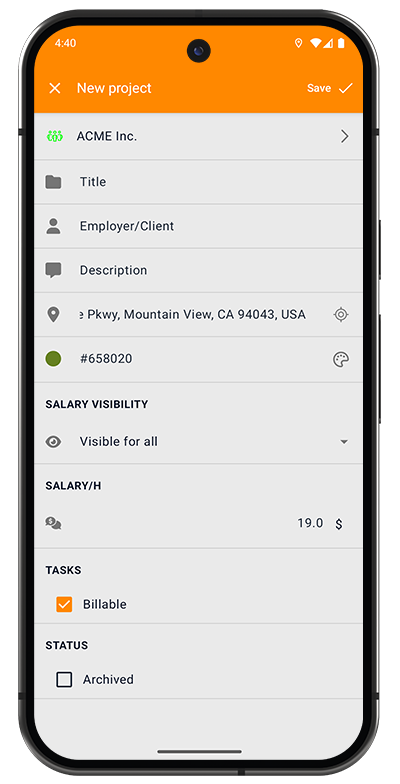
Project fields
Team Assignment (Pro Feature):
- Team selector (top selector): Assign project to a team
- Available with Timesheet Pro subscription
- Assign specific team members as project members for access
- Projects can be personal or team-based
- Tap to select from your available teams
After assigning a project to a team, you can add specific team members as project members. Only assigned project members (and Team Managers) can view and track time on the project. This enables granular access control for collaborative time tracking, shared reporting, and centralized project management.
Basic Information:
-
Title: Project name that appears in lists and the timer
- Make it descriptive and unique
- Example: "Website Redesign 2025" or "Q1 Marketing Campaign"
-
Employer/Client: Organization or individual client name
- Helps organize projects by client
- Appears below project name in lists
- Can be used for filtering and reporting
-
Description: Work scope, deliverables, or notes
- Helps you remember project context
- Useful for reports and invoicing
-
Location: Work site address (informational)
- Store the office or work site address for reference
- Shows distance from your current position
- Tap GPS icon to use current location
- Note: Location-based automations are created separately
-
Color: Visual identifier (hex code or picker)
- Tap color circle to open color picker
- Each project gets a unique color automatically
Financial Settings:
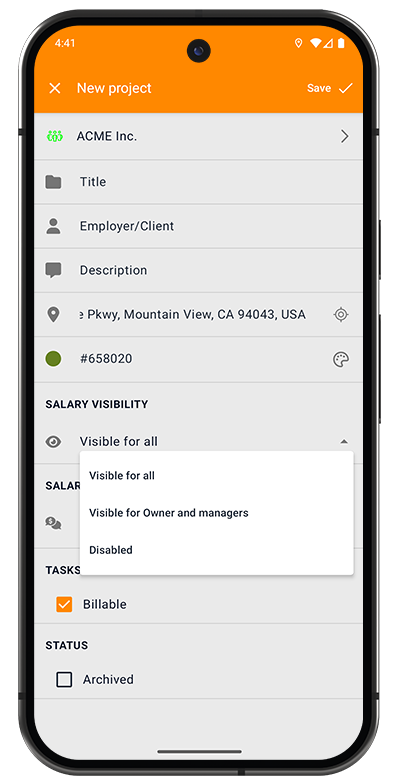
- SALARY VISIBILITY: Control who can see earnings data
- Visible for all: Everyone with access can view salary info
- Visible for Owner and managers: Restricted to authorized users only
- Disabled: Salary information hidden from reports
- SALARY/H: Hourly rate for this project
- Enter your billable rate (e.g., "19.0 $")
- Used to calculate project earnings automatically
- Can be adjusted anytime
Task Settings:
- Billable checkbox: Mark tasks as billable by default
- Tasks created for this project inherit this billable flag
- Billable is a true/false marker used for filtering and salary statistics
- Can be overridden on individual tasks
Project Status:
- Archived checkbox: Mark as archived
- Typically left unchecked for new projects
- Archive completed projects to declutter your active list
You only need a Title to create a project. Add financial details and location information later as needed. Focus on getting started quickly!
Finding and organizing projects
Search projects
Tap the search icon (magnifying glass) in the toolbar to quickly find projects:
- Search by project name, client, or description
- Results update as you type
- Supports partial text matches
- Case-insensitive search
Filter and sort
Tap the filter icon (funnel) to customize your project list view:
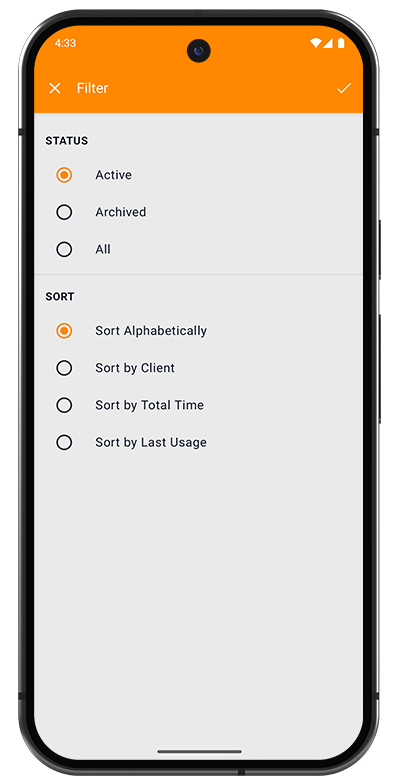
STATUS Filters:
- Active: Show only currently active projects (default)
- Archived: Display completed or archived projects only
- All: View all projects regardless of status
SORT Options:
- Sort Alphabetically: A-Z by project name (default)
- Sort by Client: Group projects by client/employer organization
- Sort by Total Time: Order by accumulated hours (highest first)
- Sort by Last Usage: Most recently tracked projects appear first
The current filter and sort settings are displayed in the Projects screen subtitle (e.g., "Active, Sort Alphabetically"), so you always know what view you're seeing.
Project details
Tap any project in the list to view comprehensive details and statistics:

Three main tabs
1. Details Tab (shown above)
Displays complete project information across several sections:
TIME:
- Total: Overall tracked time for this project (gray)
- rel. Duration: Billable work time excluding breaks (green)
- Breaks: Total pause time across all sessions (orange)
DETAILS:
- Project description and scope
- Location with full address
- Distance from current location (in miles or kilometers)
- Hourly rate (Salary/h)
- Project status (Active or Archived)
SALARY:
- Total: Complete earnings for this project (gray)
- rel. Salary: Earnings from billable time only (green)
- Breaks: Potential earnings lost during breaks (orange)
EXPENSES:
- Total: Sum of all project-related costs (gray)
- Paid: Expenses that have been reimbursed (green)
- Unpaid: Outstanding expenses awaiting payment (red)
2. Tasks Tab
View and manage all time entries for this project:
- Complete list of tasks/time sessions
- Edit, delete, or duplicate tasks
- Filter tasks by date range
- Export task data
3. Statistics Tab
Analyze project performance with visual charts and metrics:
- Time distribution graphs
- Earnings trends over time
- Productivity patterns
- Comparative analytics
Project actions
Access additional options via the toolbar icons:
- Share icon: Export project data or share reports
- Edit icon (pencil): Modify project details
- Menu icon (three dots): Additional actions:
- Add new task
- Delete project