Tags and rates
Tags
Tags are powerful labels that help you categorize and analyze tasks across all your projects. Unlike projects which organize work by client or deliverable, tags organize by activity type, making it easy to see how much time you spend on specific kinds of work.
Why use tags?
- Cross-Project Analysis: See total time spent on "Meetings" across all clients
- Activity Tracking: Monitor how much time goes to "Development" vs "Documentation"
- Quick Filtering: Find all tasks with a specific tag instantly
- Detailed Reporting: Generate reports by activity type
- Productivity Insights: Understand where your time actually goes
Tag list
The Tags screen shows all your tags with accumulated time totals:
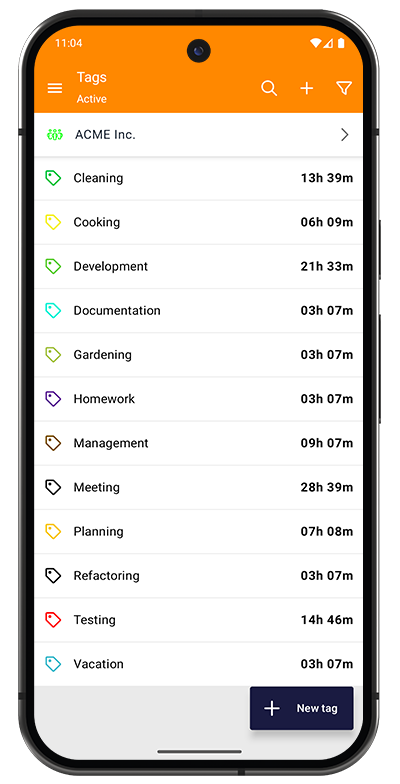
Header Information:
- Team selector: Switch between teams (Pro feature) or view personal tags
- Active: Current filter showing active (non-archived) tags
- Toolbar icons: Search, filter, and create new tags
Tag List Display:
Each tag shows:
- Color-coded icon: Visual identifier using the tag's assigned color
- Tag name: Label for the activity type
- Total time: Accumulated hours across all tasks with this tag (right side)
Examples shown: "Development" (21h 33m), "Meeting" (28h 39m), "Testing" (14h 46m)
Creating a Tag: Tap the "+ New tag" button at the bottom to create a new tag.
Creating and editing tags
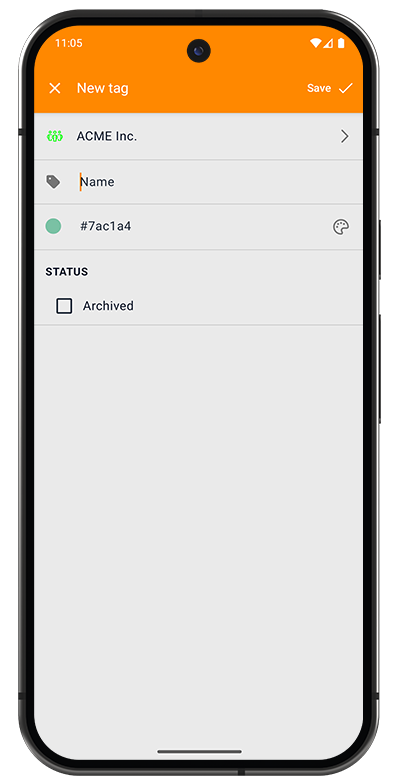
Tag Fields:
- Team selector (top): Assign tag to a team (Pro feature) or keep personal
- Name: Tag label (e.g., "Meeting", "Development", "Research")
- Color: Visual identifier as hex code (e.g., "#7ac1a4")
- Tap the color circle to open color picker
- Colors help quickly identify tags in task lists
STATUS:
- Archived checkbox: Hide tag from active lists
- Archived tags remain on existing tasks
- Useful for tags no longer needed for new tasks
To Edit a Tag:
- Tap any tag in the list
- Modify name, color, or status
- Tap Save to update
Example tag categories
- Activity Type: Development, Testing, Documentation, Meetings
- Work Phase: Planning, Execution, Review, Deployment
- Skill Area: Design, Coding, QA, Management
Rates
Custom rates allow you to adjust earnings calculations beyond the default project rate. Use them for overtime, weekend work, specialized skills, or any situation requiring different compensation.
Understanding rates
Regular Rate:
- Each project has a default hourly rate (e.g., $10/h)
- This is the "Regular" rate shown when creating tasks
- Most tasks use this standard rate
Custom Rates:
- Modify earnings using two components: Factor and Extra/h
- Can be applied to individual tasks
- Allow flexible compensation models
Rate list
The Rates screen shows all configured custom rates:
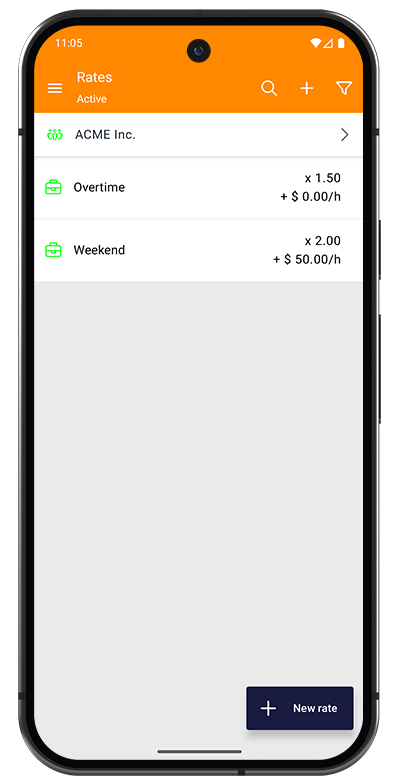
Header Information:
- Team selector: Switch between teams (Pro feature) or view personal rates
- Active: Current filter showing active (non-archived) rates
- Toolbar icons: Search, filter, and create new rates
Rate List Display:
Each rate shows:
- Color-coded icon: Visual identifier
- Rate name: Purpose or condition (e.g., "Overtime", "Weekend")
- Factor: Multiplier applied to project rate (e.g., "x 1.50")
- Extra/h: Additional amount per hour (e.g., "+ $ 50.00/h")
Creating a Rate: Tap the "+ New rate" button at the bottom to create a custom rate.
Creating and editing rates
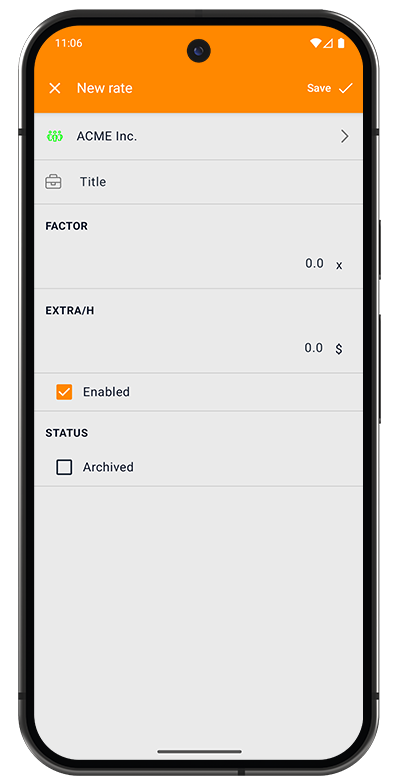
Rate Fields:
- Team selector (top): Assign rate to a team (Pro feature) or keep personal
- Title: Rate name describing when to use it (e.g., "Overtime", "Weekend", "Rush Job")
FACTOR:
- Multiplier applied to the base project rate
- Enter as decimal (e.g., "1.5" for 150%, "2.0" for 200%)
- Default: 1.0 (no change)
- Displayed as "x 1.50" in the list
EXTRA/H:
- Fixed additional amount added per hour
- Enter in your currency (e.g., "50.0" for $50/hour extra)
- Default: 0.0 (no addition)
- Displayed as "+ $ 50.00/h" in the list
OPTIONS:
- Enabled checkbox: Make rate available for task selection
- Unchecked rates are disabled but not deleted
- Useful for seasonal or temporary rates
STATUS:
- Archived checkbox: Hide rate from active lists
- Archived rates remain on existing tasks
- Can be reactivated if needed
To Edit a Rate:
- Tap any rate in the list
- Modify title, factor, extra/h, or status
- Tap Save to update
Rate calculation formula
When you apply a custom rate to a task, earnings are calculated as:
Task Earnings = Hours × (Project Rate × Factor + Extra/h)
Calculation examples
Assuming a project rate of $100/hour and 10 hours worked:
Standard Rate (Regular):
- Factor: 1.0, Extra: $0
- Calculation: 10 × ($100 × 1.0 + $0) = $1,000
Overtime Rate:
- Factor: 1.5, Extra: $0
- Calculation: 10 × ($100 × 1.5 + $0) = $1,500
- (50% increase)
Weekend Rate:
- Factor: 2.0, Extra: $50
- Calculation: 10 × ($100 × 2.0 + $50) = $2,500
- (Double rate plus $50/hour bonus)
Rush Job:
- Factor: 1.0, Extra: $25
- Calculation: 10 × ($100 × 1.0 + $25) = $1,250
- (Standard rate plus $25/hour premium)
Common rate scenarios
- Overtime: Factor 1.5, Extra $0 (time and a half)
- Weekend: Factor 2.0, Extra $0 (double time)
- Holiday: Factor 2.5, Extra $0 (or higher)
- Rush Work: Factor 1.0, Extra $50 (normal rate + premium)
- Specialized Skill: Factor 1.25, Extra $0 (25% increase)
Custom rates only apply to tasks where you explicitly select them. They do not retroactively affect existing tasks or change the default project rate.