Tasks
Tasks are time entries that record your actual working hours. Each task represents an activity completed as part of a project, with start and end times, descriptions, and optional metadata like tags, expenses, and notes.
On this page: task fields · the task list and filters · creating manually · editing · bulk actions · exporting.
On iPad with enough screen space (full-screen or a wide split view), the Tasks screen renders as a two-column list + detail layout. Tapping a row opens the edit view in the right column. See iPad Cockpit → List + detail.
Task Basics
What is a task?
A task is a single time entry — a start time, an end time, a project it belongs to, and whatever optional context you add (description, tags, location, rate, and more). Duration is derived automatically from start and end.
Tasks come in three flavours, picked when you create them:
- Task — the standard work entry. Most of your entries will be these.
- Mileage — travel, with origin, destination, and distance.
- Call — a phone call, with the contact's number.
Four ways to create a task
You can:
- Use the timer for real-time tracking while you work — the most accurate path.
- Add manually when you forgot to start the timer.
- Apply a template when a kind of task repeats — preset project, rate, tags, and description in one tap. See Task Templates.
- Duplicate an existing task to copy its breaks, expenses, and notes along with the fields.
Task Fields
Every task has three required fields: a project (which one this work belongs to), a start time, and an end time — the end is blank while the timer is still running.
Beyond the required fields, you can flesh out a task with any of the following:
Type. Each task is one of three kinds — a standard Task, a Mileage entry (with origin, destination, and distance), or a Call entry (with phone number). The form swaps in the right extra fields based on the type you pick.
Description. Anything you want to say about the work. Supports Markdown formatting.
Location. Where the work happened — handy for site visits and client work.
Tags. Color-coded labels for cross-project categorisation. Apply as many as you like.
Rate. Picks a billing rate to apply for earnings calculation. Inherited from the project's default rate if you've set one.
Billing status. Three flags — Billable (is it chargeable?), Billed (has it been invoiced?), and Paid (has the invoice been settled?). The latter two only show up when Billable is on.
Feeling. Optional mood indicator — an emoji you pick to remember how the work session felt. Useful when reviewing past patterns.
Signature. Hand-drawn confirmation. Mostly used in field-service workflows where a customer signs off on the time.
Breaks. Added inline at the bottom of the form — each break has a start time, end time, and duration. Tap New Break to add one at the task's midpoint with your default break duration; swipe left to remove. Breaks save together with the task in a single action. Overlapping breaks merge automatically on save, and breaks outside the task's time range get truncated.
Task List
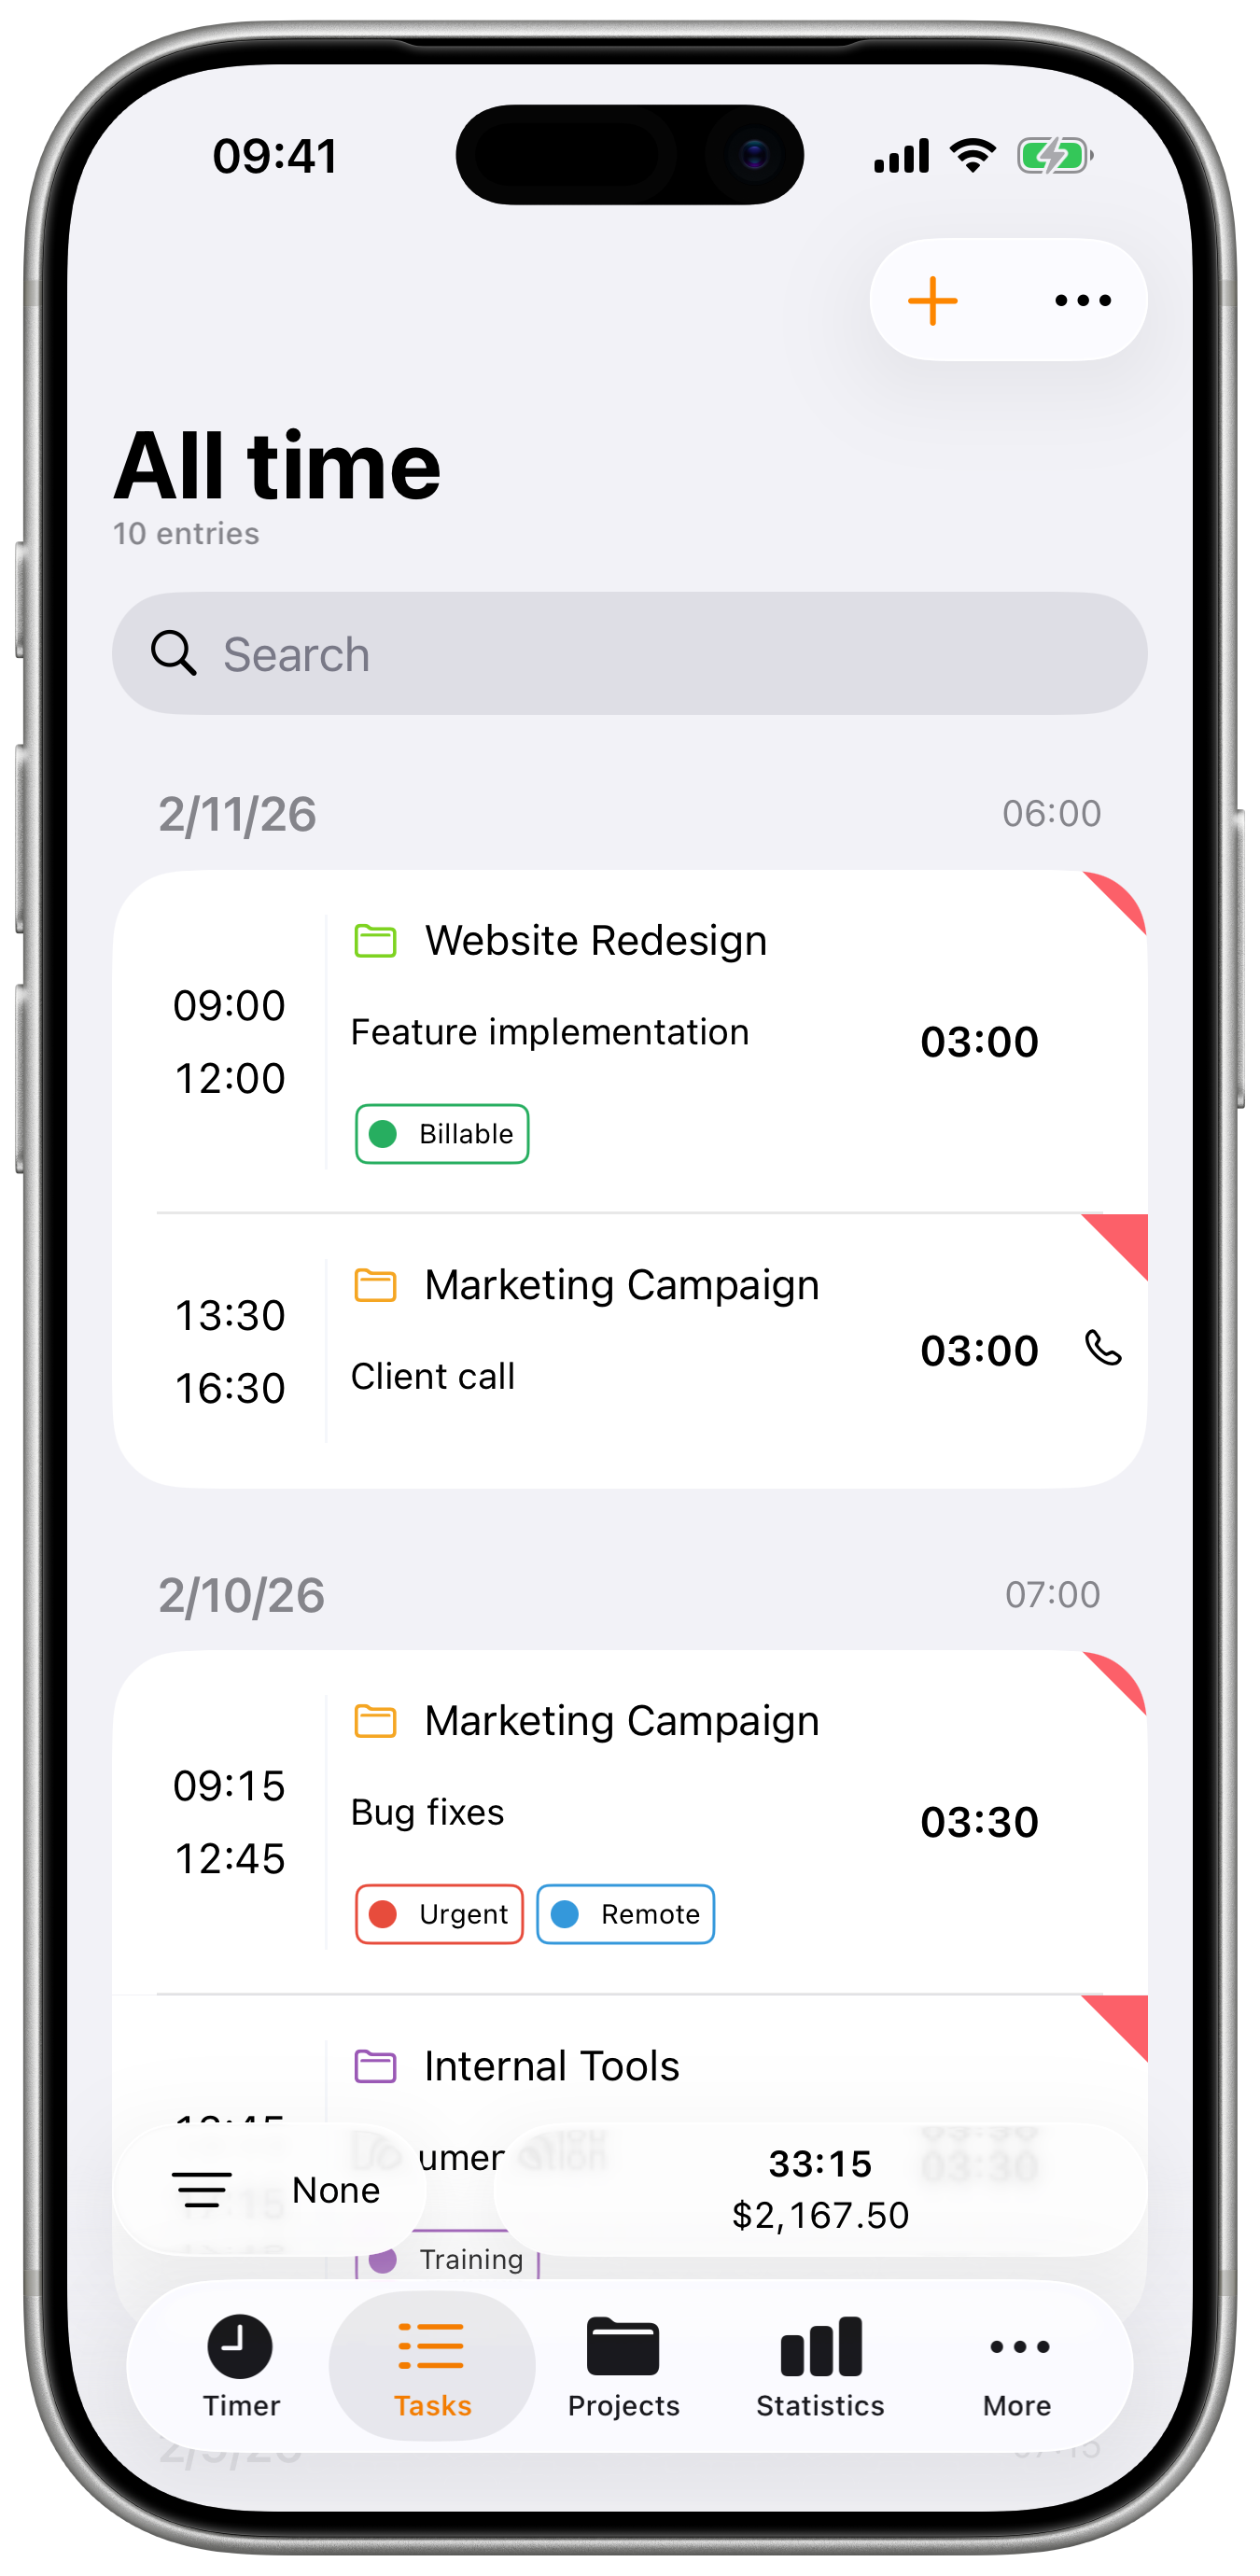
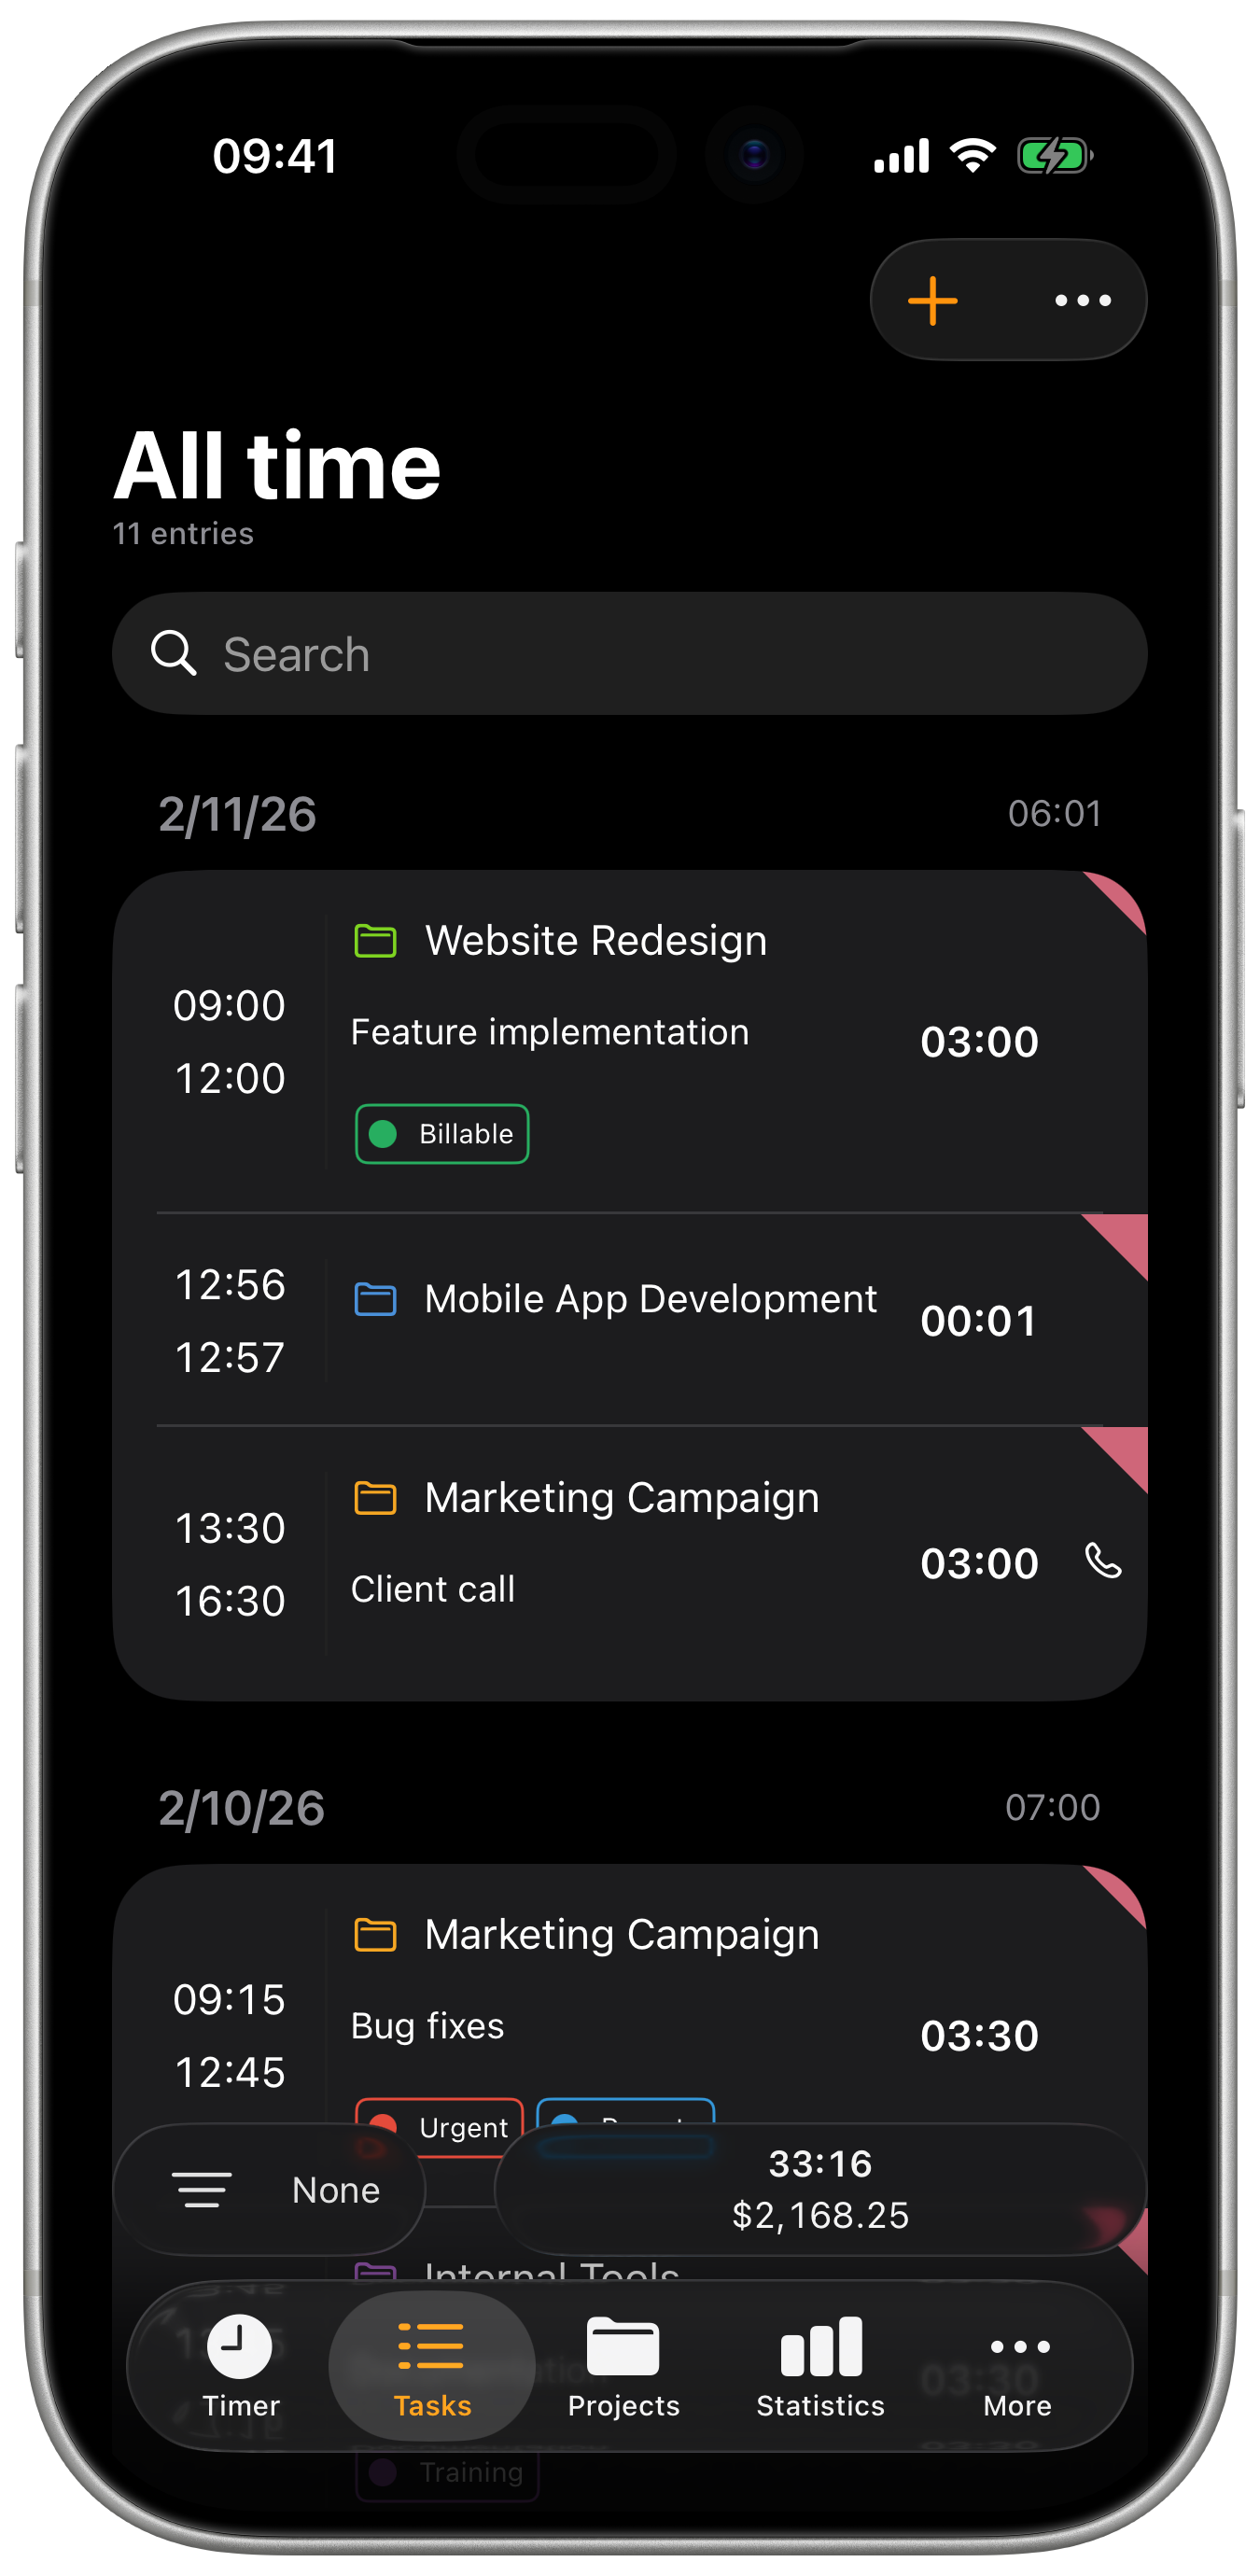
The task list displays all your time entries for a selected period.
Accessing the Task List
- Open the Tasks tab
- View entries for the current filter period
- Scroll to see more entries
- Tap any task to view details
Task List Display
Each task in the list shows:
- Project color - Visual indicator on the left
- Time range - Start and end times
- Duration - Total time
- Description - Task description if entered
- Tags - Color-coded tag chips
- Status indicators - Billable, paid, or other flags
Searching Tasks
Use the search bar at the top of the task list to find specific entries:
- Search by description text
- Results update as you type
- Works with current filters applied
Changing the Time Range
Tap the header showing the current period to change the view:
| Period | Description |
|---|---|
| Today | Current day's entries |
| Yesterday | Previous day's entries |
| This Week | Current week (respects first day setting) |
| Last Week | Previous week |
| This 2 Weeks | Current two-week period |
| Last 2 Weeks | Previous two weeks |
| Last 4 Weeks | Previous four weeks |
| This Month | Current calendar month |
| Last Month | Previous calendar month |
| This Quarter | Current quarter |
| Previous Quarter | Previous quarter |
| This Year | Current calendar year |
| Last Year | Previous calendar year |
| Custom | Select specific start and end dates |
| Single Date | View a specific date |
| All Time | View all entries |
Swipe left/right on the task list header to quickly move between periods (previous/next week, month, etc.).
Filtering Tasks
Filter Options
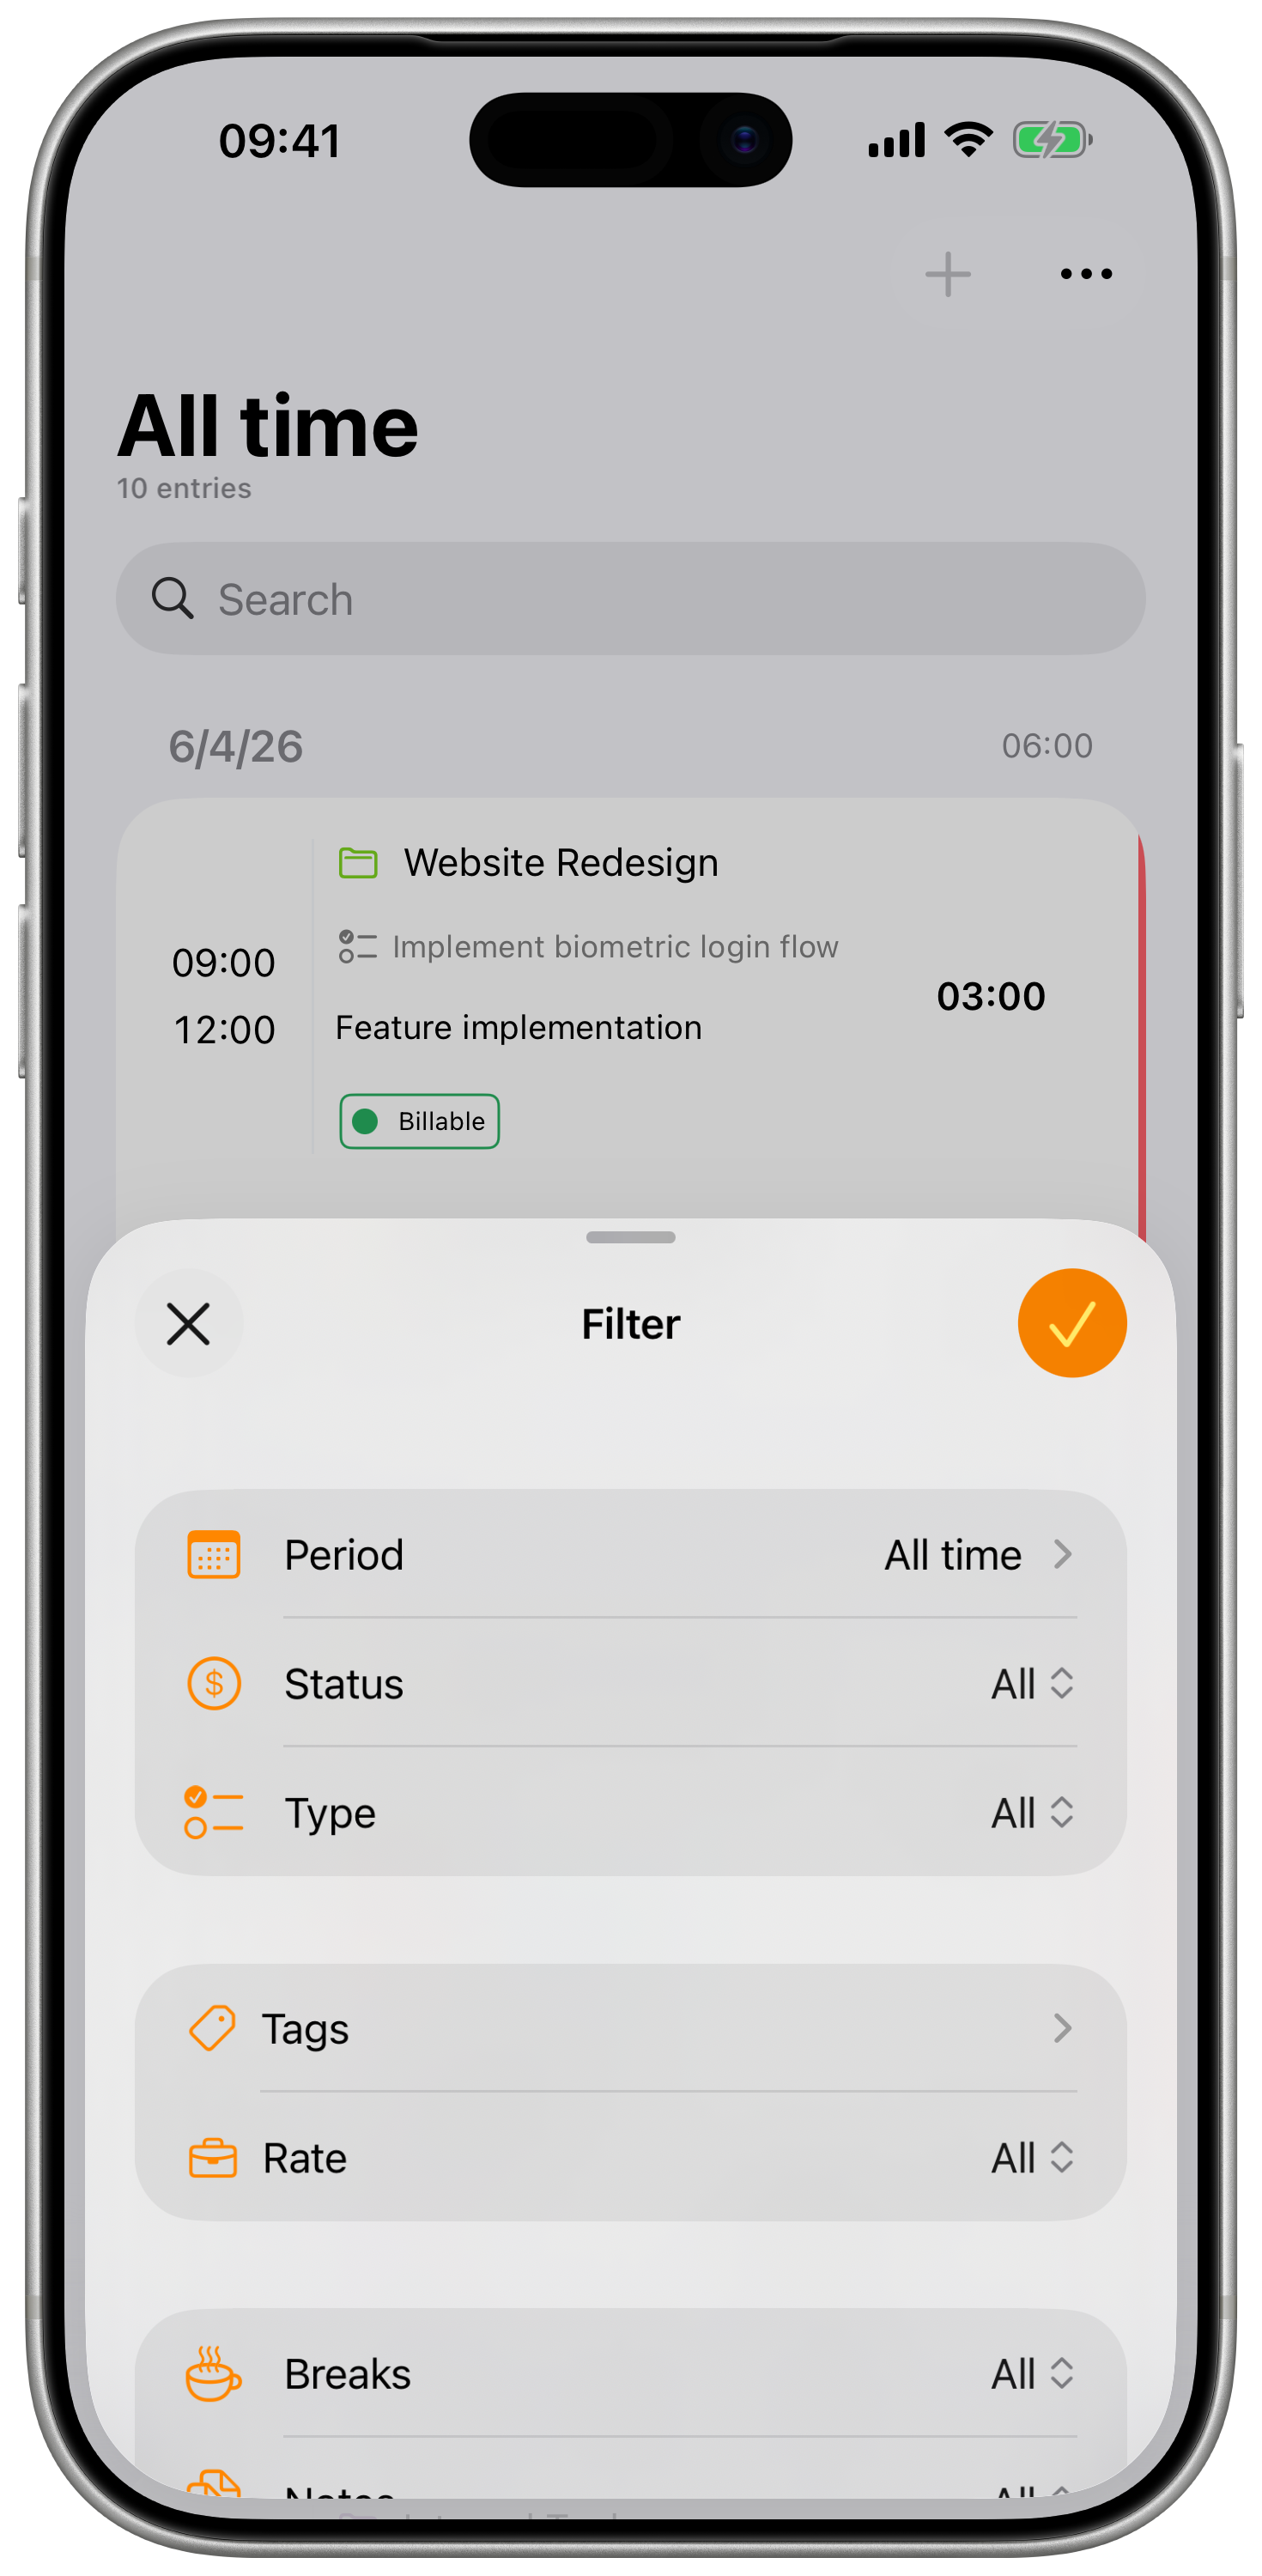
By Time Range
Select a predefined period or custom date range.
By Project
- Select specific projects to view
- Multiple projects can be selected
- Useful for client reporting
By Status
| Status | Description |
|---|---|
| All | No status filter applied |
| Billable | Tasks marked as billable |
| Not Billable | Tasks not marked billable |
| Paid | Billable tasks marked as paid |
| Unpaid | Billable tasks not yet paid |
| Billed | Tasks that have been invoiced |
| Not Billed | Billable tasks not yet invoiced |
| Outstanding | Billed but unpaid tasks |
By Type
- Task - Standard work entries
- Mileage - Travel entries
- Call - Phone call entries
- All - All types
By Tags (Plus/Pro)
- Filter by one or more tags
- Shows only tasks with selected tags
By Rate (Plus/Pro)
- Filter by specific billing rate
By Breaks (Plus/Pro)
| Option | Description |
|---|---|
| All | Show all tasks |
| With Breaks | Only tasks that have breaks |
| Without Breaks | Only tasks without breaks |
By Notes (Plus/Pro)
| Option | Description |
|---|---|
| All | Show all tasks |
| With Notes | Only tasks that have notes attached |
| Without Notes | Only tasks without notes |
By Expenses (Plus/Pro)
| Option | Description |
|---|---|
| All | Show all tasks |
| With Expenses | Only tasks that have expenses |
| Without Expenses | Only tasks without expenses |
By Feeling (Plus/Pro)
Filter tasks by the mood/feeling indicator you assigned when tracking.
Saving Filters
Your filter settings are automatically saved and persist between sessions.
Filter Bar
The bottom of the task list shows a filter bar with:
- Filter button (left) - Tap to open filter options
- Shows icons indicating active filters (type, status, tags, rate, etc.)
- Tap the filter icons to see a summary popover of active filters
- Filter icon turns accent color when filters are active
- Statistics (center) - Duration and earnings totals for current view
Task List Menu
Access additional options from the three-dot menu (⋯) in the toolbar:
Sort Order
| Option | Description |
|---|---|
| Ascending | Oldest tasks first |
| Descending | Newest tasks first (default) |
Status Display
Choose how task status is displayed in the list:
- Configure which status indicators are shown
- Helps focus on relevant information
Selection Mode
- Select - Enter selection mode to choose multiple tasks
- Select All - Select all tasks matching current filters
- Deselect All - Clear all selections (shown when many tasks selected)
Bulk Actions
When in selection mode, a toolbar appears at the bottom with actions for selected tasks.
Selecting Tasks
- Tap the three-dot menu (⋯)
- Tap Select to enter selection mode
- Tap tasks to select/deselect them
- Use Select All from the menu to select all filtered tasks
Available Bulk Actions
With tasks selected, the bottom toolbar shows:
| Action | Description |
|---|---|
| Export | Export selected tasks to CSV/Excel |
| Copy | Copy tasks to a different project |
| Move | Move tasks to a different project |
| Change Status | Update billable/billed/paid status |
| Delete | Delete selected tasks |
Export Selected Tasks
- Select the tasks you want to export
- Tap Export in the bottom toolbar
- Choose export format and options
- Share or save the file
This is useful for creating invoices or reports for specific tasks rather than a full time range.
Copy or Move Tasks
- Select tasks to copy or move
- From the bottom toolbar, choose Copy or Move
- Select the destination project
- Confirm the action
Copy creates duplicates in the new project while keeping originals. Move transfers tasks to the new project.
Bulk Status Changes
Change status for multiple tasks at once:
- Select the tasks
- From the bottom toolbar, choose Change Status
- Select the new status:
- Billable / Not Billable
- Billed / Not Billed
- Paid / Unpaid
Selection Statistics
While tasks are selected, the bottom bar shows:
- Total duration of selected tasks
- Total earnings of selected tasks
This helps verify you've selected the correct tasks before performing actions.
Creating Tasks Manually
Add a New Task
- Tap the + button on the Timer or Task List screen
- Select a project
- Set start and end times
- Choose task type
- Add description and other details
- Tap Save
Using Templates
If you have Task Templates configured:
- Tap + to create a new task
- Template chips appear at the top
- Tap a template to apply its settings
- Adjust times as needed
- Save the task
Duration Field
Toggle the duration field from the menu (three dots) to enter time by duration instead of end time:
- Select hours and minutes
- End time calculates automatically
- Useful for fixed-duration entries
Editing Tasks
Edit a Single Task
- Tap the task in the list
- Modify any fields
- Tap Save to apply changes
Quick Status Changes
While viewing a task, toggle:
- Billable status
- Billed status
- Paid status
Bulk Editing
Select multiple tasks to change their status:
- Tap the three-dot menu (⋯) and choose Select
- Tap tasks to select them
- Use Select All from the menu for all visible tasks
- Choose an action from the bottom toolbar:
- Mark as Billable/Not Billable
- Mark as Paid/Unpaid
- Mark as Billed/Not Billed
- Delete selected
Deleted tasks cannot be recovered. Use caution when deleting multiple tasks at once.
Task Details
Viewing Full Details
Tap any task to see its complete information:
- Duration breakdown - Total, work time, break time
- Earnings - Calculated from rate and duration
- All metadata - Description, tags, location
- Related items - Breaks, expenses, notes
Task Tabs
Within task details, tabs organize related information:
| Tab | Contents |
|---|---|
| Details | Main task information |
| Breaks | Break periods during this task |
| Notes | Additional documentation |
| Expenses | Costs related to the task |
Related Items
Breaks
Track non-working time during a task:
- Pause the timer to start a break
- Or add breaks manually after the fact
- Break time is subtracted from work duration
- Each break has start/end time and optional description
Expenses
Track costs associated with tasks:
- Amount and category
- Date of expense
- Description
- Receipt attachment (photo)
- Paid/unpaid status
Notes
Document additional information:
- Multiple notes per task
- Timestamped entries
- Rich text content
Deleting Tasks
Delete a Single Task
- Open the task
- Scroll to bottom
- Tap Delete Task
- Confirm deletion
Delete Multiple Tasks
- Tap the three-dot menu (⋯) and choose Select
- Tap tasks to select them
- Tap the delete action in the bottom toolbar
- Confirm deletion
Swipe to Delete
On the task list:
- Swipe left on a task
- Tap Delete
Context Menu Actions
Long-press any task in the list to access quick actions:
| Action | Description |
|---|---|
| Change Status | Update billable/billed/paid status |
| New Break | Add a break to this task |
| New Expense | Add an expense to this task |
| New Note | Add a note to this task |
| Duplicate | Create a copy including all breaks, expenses, and notes |
| Edit | Open the task edit form |
| Delete | Delete the task |
Duplicating Tasks
When you duplicate a task, the copy includes:
- All task fields (project, description, type, rate, tags, etc.)
- All breaks with their original times
- All expenses with amounts, descriptions, and attachments
- All notes with text and attachments
This is useful for recurring work patterns where you consistently have the same break schedule, expenses, or documentation.
Exporting Tasks
Export your task data for reporting or invoicing.
Quick Export
- Go to the Export screen
- Select time range and filters
- Choose format (CSV, Excel)
- Share or save the file
See Export for detailed instructions.
Best Practices
Accurate Time Tracking
- Start timer immediately - Don't estimate later
- Use breaks properly - Pause for interruptions
- Add descriptions promptly - Details fade quickly
- Review daily - Catch errors while fresh
Efficient Organization
- Use consistent tags - Enables better filtering
- Set project defaults - Reduces manual entry
- Create templates - For recurring tasks
- Choose correct task type - Mileage for travel, Call for calls
Billing Accuracy
- Mark billable tasks - As you create them
- Assign rates - For earnings calculation
- Use status workflow - Billable → Billed → Paid
- Export filtered lists - For client invoices
Troubleshooting
Tasks Not Appearing
- Check the current filter settings
- Verify the time range includes the task date
- Check project filter isn't excluding the task
- Pull down to refresh/sync
Duration Seems Wrong
- Check for overlapping breaks
- Verify start and end times are correct
- Check if relative duration display is enabled
- Review rounding settings
Can't Edit a Task
- Ensure you have network connection (for synced tasks)
- Check if task is from a shared project
- Verify your permissions (team projects)
- Force close and reopen app