Documents
Documents turn your tracked, billable work into professional PDF files you can send to clients or keep for your records. You can create invoices, timesheets, and work records, save reusable templates, and track which invoices have been paid.
Documents are available on the Pro plan and above. The web app includes a 30-day trial.
Document list
The document list shows everything you have created, grouped by type. This is your starting point for creating, editing, and tracking documents.

What you see:
- Invoices, Timesheets, and Work Records tabs to switch between document types.
- A Search box to find documents by title or customer.
- A status filter (set to All by default) to narrow the list, for example by paid or unpaid invoices.
- An organization filter (All organizations) to show documents for a specific organization.
- A Documents / Templates toggle to switch between your saved documents and your reusable templates.
- Invoice Series (top right) to manage automatic invoice numbering.
- New Document (top right) to start a new document.
The table columns:
- Date: the document date.
- Invoice No.: the invoice number.
- Title: the document title.
- Customer: the customer the document is addressed to.
- Total: the document total.
- Paid: how much has been paid so far.
- Status: for example Unpaid or paid.
- Edit and Delete: actions for each row.
Creating a document
Click New Document to open the form. The form is split into sections that you fill in from top to bottom.
General document information
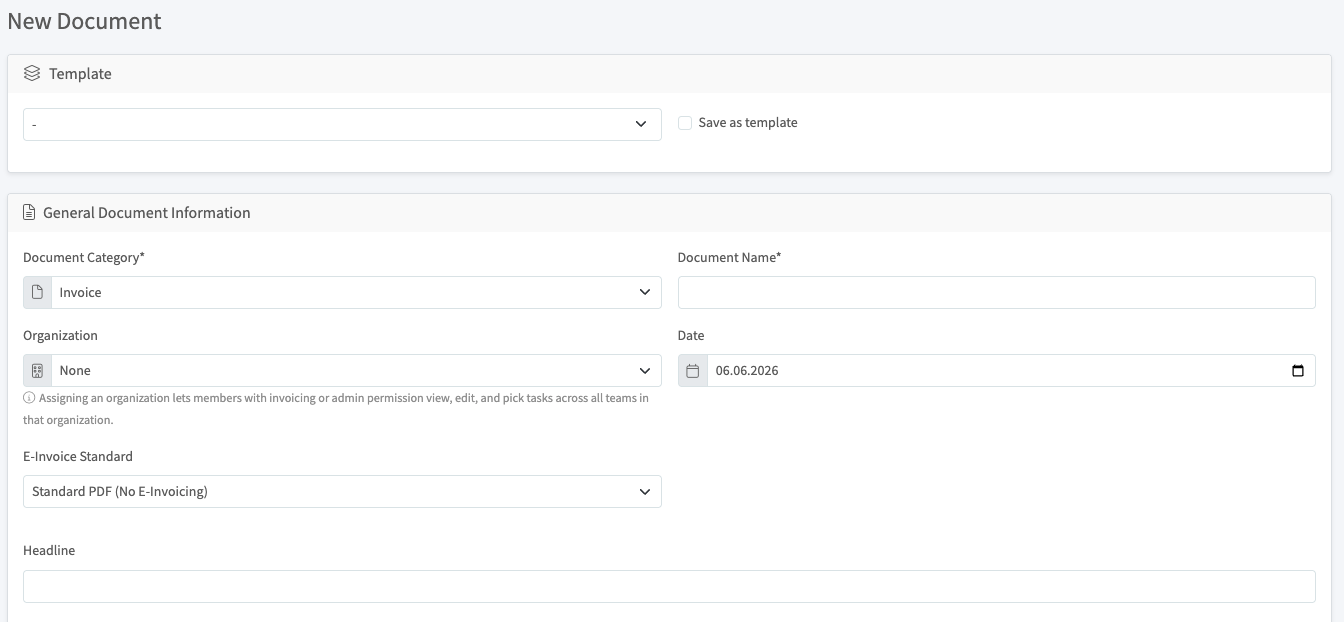
Template: At the top, you can choose an existing Template from the dropdown to prefill the form. Tick Save as template to store the current document as a reusable template for next time.
General Document Information: Fill in the core details of the document.
- Document Category (required): choose the type of document, for example Invoice.
- Document Name (required): the title shown on the document and in the list.
- Organization: leave this as None for a personal document, or assign an organization. Assigning an organization lets members with invoicing or admin permission view, edit, and pick tasks across all teams in that organization.
- Date: the document date. It defaults to today.
- E-Invoice Standard: choose Standard PDF (No E-Invoicing) for a regular PDF, or select an e-invoicing standard if you need one.
- Headline: optional text shown as the heading on the document.
Numbering, customer, and logo
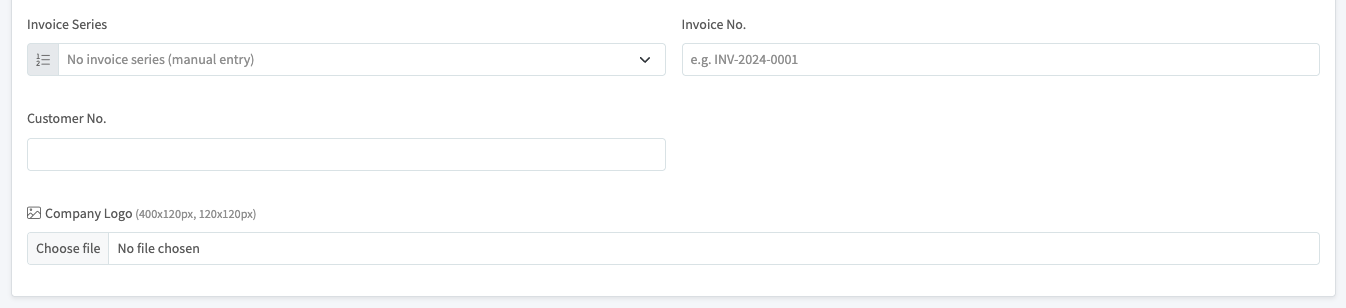
- Invoice Series: select a series to number the invoice automatically, or keep No invoice series (manual entry) to enter the number yourself.
- Invoice No.: the invoice number, for example
INV-2024-0001. This is filled in automatically when you use an invoice series. - Customer No.: an optional reference for the customer.
- Company Logo: upload a logo to appear on the document. The recommended sizes are 400x120px or 120x120px. Click Choose file to upload.
Continue through the rest of the form to add the work, expenses, and totals that make up the document, then save it.
Saving and reusing templates
If you create similar documents often, tick Save as template when creating a document. Saved templates appear under the Templates toggle in the document list, and you can select them from the Template dropdown to prefill a new document.
Invoice numbering with series
Use Invoice Series (from the document list or the Invoice Series field in the form) to number your invoices automatically. When a series is selected, the Invoice No. is generated for you, so numbering stays consistent. To enter numbers manually instead, keep No invoice series (manual entry) selected.
Tracking payments
Each invoice in the list shows its Total, the amount Paid, and a Status such as Unpaid. Update these as payments come in so you can see at a glance which invoices are still outstanding.