Email Actions
An email action sends an email automatically whenever a task is created. Use it to notify a client when work is logged, send yourself a copy of each entry, or deliver a work record without any manual step.
Email actions require a Pro plan or above. See the Plans page for the full comparison.
How it works
- You create an email action and choose which tasks trigger it.
- When a matching task is created, Timesheet waits for the delay you set.
- It fills your placeholders with the task and project details, then sends the email.
Email actions fire only when a task is created, not when an existing task is edited later.
Create an email action
In the web app, open Integrations, find the Email Actions card, and select Setup Emails. Then add a new action.
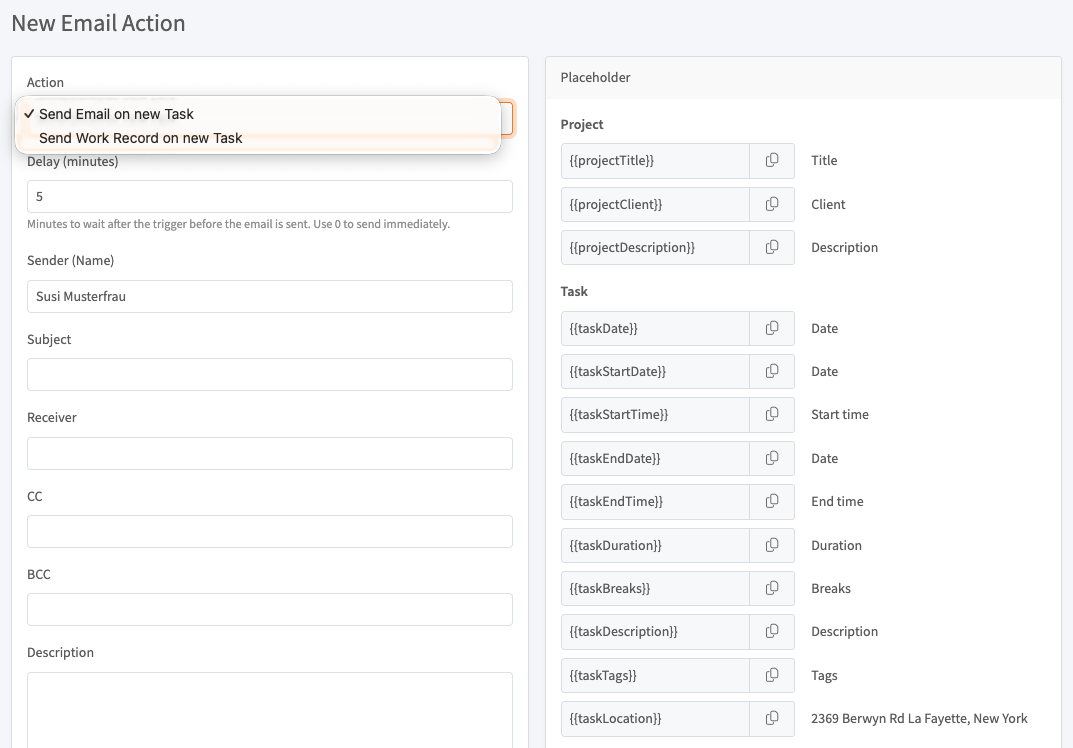
Action
- Send Email on new Task: sends a plain email with your subject and message.
- Send Work Record on new Task: attaches a PDF work record of the task to the email. You give the attachment a file name.
Fields
- Delay (minutes): how long to wait after the task is created before sending. Use 0 to send immediately.
- Sender (Name): the name shown as the sender. The email is sent by Timesheet on your behalf.
- Subject: the email subject. It supports placeholders.
- Receiver: one or more recipient addresses, separated by commas. You can also use the
{{memberEmail}}placeholder to send to the team member on the task. - CC and BCC: optional copy recipients, in the same format as Receiver.
- Description: the email body. It supports placeholders.
Which tasks trigger it
You can limit an action to certain projects, team members, and tags. A task triggers the action only when it matches every filter you set. Leave a filter empty to match everything in that category, so an action with no filters runs for every new task.
Placeholders
Placeholders are wrapped in double curly braces, like {{projectTitle}}. When the email is sent, each one is replaced with the matching value from the task. Select the copy icon next to a placeholder in the form to copy it. You can use placeholders in the subject, the body, the recipient fields, and the work record file name.
Project
| Placeholder | Replaced with |
|---|---|
{{projectTitle}} | Project title |
{{projectClient}} | Project client |
{{projectDescription}} | Project description |
Task
| Placeholder | Replaced with |
|---|---|
{{taskDate}} | Task date |
{{taskStartDate}} | Start date |
{{taskStartTime}} | Start time |
{{taskEndDate}} | End date |
{{taskEndTime}} | End time |
{{taskDuration}} | Duration |
{{taskBreaks}} | Break time |
{{taskDescription}} | Task description |
{{taskTags}} | Task tags |
{{taskLocation}} | Task location |
Team member
| Placeholder | Replaced with |
|---|---|
{{memberName}} | Full name |
{{memberFirstname}} | First name |
{{memberLastname}} | Last name |
{{memberEmail}} | Email address |
{{memberEmployeeId}} | Employee ID |
Dates, times, and durations use the formats set in your Settings.
See also
- Integrations: the marketplace, API keys, and webhooks.
- Zapier: trigger actions in thousands of other apps.
- Settings: the date, time, and duration formats used in placeholders.