Tags
Tags sind Beschriftungen, die Sie Aufgaben hinzufügen können, um Ihre Arbeit projektübergreifend zu kategorisieren. Eine Aufgabe kann einen Tag aus einem beliebigen Projekt desselben Teams verwenden, sodass Sie ähnliche Tätigkeiten (zum Beispiel "Entwicklung" oder "Meetings") unabhängig davon gruppieren können, zu welchem Projekt sie gehören.
Tag-Liste
Die Tag-Liste zeigt alle Tags für das ausgewählte Team.
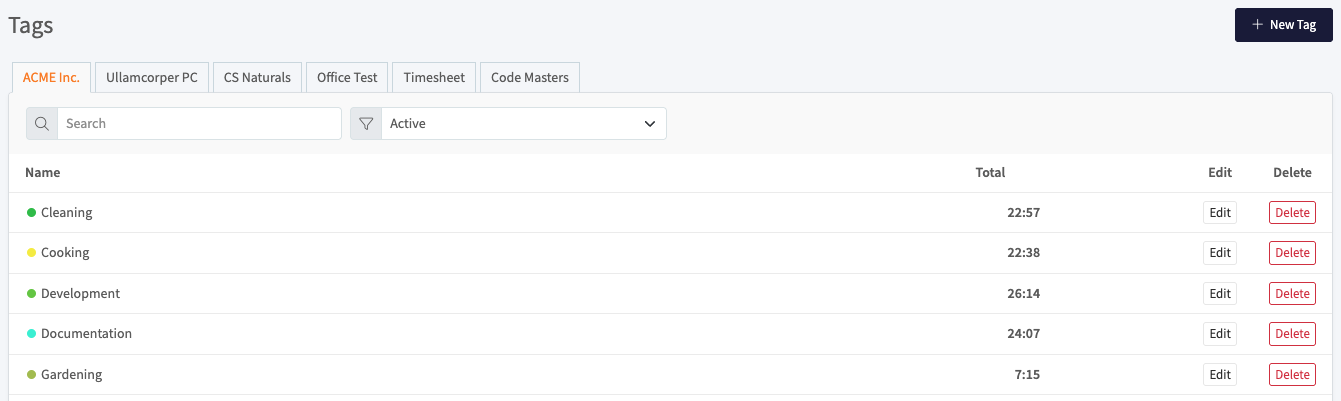
- Team-Tabs: Jeder Tab oben ist eines Ihrer Teams. Wählen Sie einen Tab, um die Tags dieses Teams anzuzeigen.
- Suche: Geben Sie in das Suchfeld ein, um die Liste nach Tag-Namen zu filtern.
- Aktiv: Verwenden Sie dieses Dropdown, um zwischen aktiven und archivierten Tags zu wechseln.
Die Tabelle hat diese Spalten:
- Name: Der Tag-Name, angezeigt neben seiner Farbe.
- Gesamt: Die insgesamt erfasste Zeit auf Aufgaben, die den Tag verwenden.
- Bearbeiten: Öffnet den Tag, damit Sie seine Details ändern können.
- Löschen: Entfernt den Tag.
Einen Tag erstellen
- Wählen Sie den Team-Tab, in dem Sie den Tag haben möchten.
- Klicken Sie oben rechts auf + Neuer Tag.
- Füllen Sie das Tag-Formular aus (siehe unten).
- Klicken Sie auf Speichern.
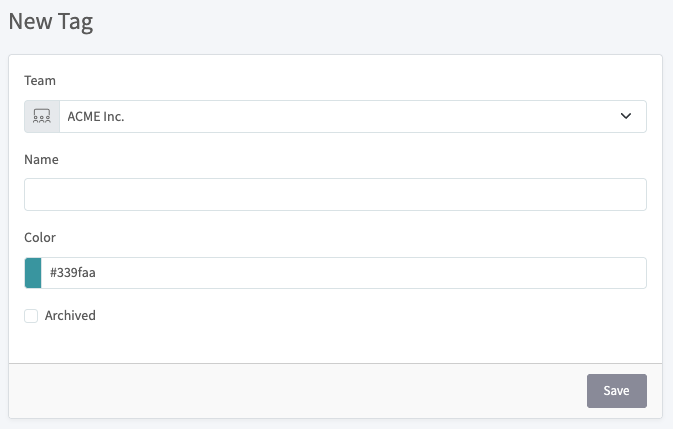
Das Formular hat diese Felder:
- Team: Das Team, zu dem der Tag gehört.
- Name: Die Beschriftung für den Tag, zum Beispiel "Kundenprüfung".
- Farbe: Die Farbe, mit der der Tag identifiziert wird. Geben Sie einen Hexwert ein oder wählen Sie eine Farbe aus dem Farbfeld.
- Archiviert: Aktivieren Sie dieses Kontrollkästchen, um den Tag aus der aktiven Liste auszublenden, ohne ihn zu löschen.
Einen Tag bearbeiten
- Klicken Sie in der Zeile des Tags auf Bearbeiten.
- Ändern Sie die Einstellung Team, Name, Farbe oder Archiviert.
- Klicken Sie auf Speichern.
Einen Tag archivieren
Beim Archivieren bleiben ein Tag und seine erfasste Zeit erhalten, er wird jedoch aus der aktiven Liste entfernt.
- Öffnen Sie den Tag mit Bearbeiten.
- Aktivieren Sie das Kontrollkästchen Archiviert.
- Klicken Sie auf Speichern.
Um archivierte Tags wieder anzuzeigen, stellen Sie das Filter-Dropdown über der Tabelle so ein, dass archivierte Tags angezeigt werden.
Einen Tag löschen
- Klicken Sie in der Zeile des Tags auf Löschen.
- Bestätigen Sie die Löschung.
Beim Löschen eines Tags wird er aus allen Aufgaben entfernt, die ihn verwenden. Die Aufgaben selbst und ihre erfasste Zeit werden nicht gelöscht.